
AutoCAD is a 2D drafting software. It is a commercial-aided design and drafting software. It is developed by Autodesk. It is a multi-field software which is used by all professionals such as Interior Designers, Civil Engineers, Architects, and Mechanical engineers. It’s a starting point of architectural, civil, mechanical even electrical designing. That’s the reason why people want to learn AutoCAD.
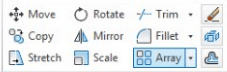
There are various panels in ribbon panel of this drafting software which consist numerous tools and commands to create any drawing easily. One such panel is Modify panel.
Modify Panel:- An Introduction
Modify Panel is a part of Ribbon Panel. We can modify any drawing by using Modify Panel commands. It is used for the editing of any existing drawing.

Essential Commands of Modify Panel in AutoCAD
There are some essential commands in Modify Panel:-
- Move (M+Enter)
- Rotate (RO+Enter)
- Copy (CO+Enter)
- Mirror (M+Enter)
- Stretch
- Scale (SC+Enter)
- Trim (TR+Enter)
- Extend (EX+Enter)
- Fillet (F+Enter)
- Chamfer (CHA+Enter)
- Blend Curves
- Erase (E+Enter)
- Offset (O+Enter)
- Array (AR+Enter)
- Explode
- Lengthen
- Break (BR+Enter)
- Break at point
- Join (J+Enter)
- Edit Hatch
- Edit Array
- Edit Polyline (PEdit+Enter)
- Edit Spline
Let’s have a look at the use of each command one by one.
Move (M+Enter):-
By this one can move any objects at a specified distance and direction.
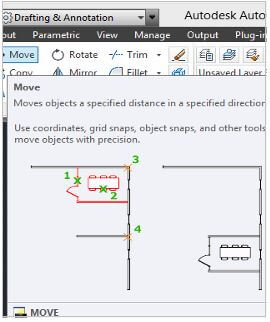
Process of using move command:-
- Select Move Command from modify panel.
- Select the object.
- Right click.
- Left click on object.
- Move it any direction.
- D Enter
- Type distance
- Enter.
Rotate (RO+Enter):-
By this one can rotate any selected object around a base point to an angle. It rotates any objects in clock and anti-clockwise. We can also make a copy of the object by rotate command.
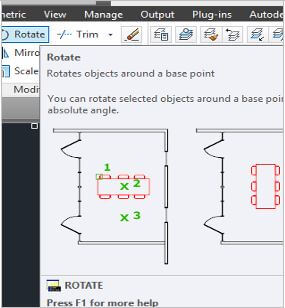
Process of using Rotate command:-
- Select Rotate command from modify panel.
- Select the object.
- Right click
- Specify base point
- Enter C (copy) or Enter R (reference)
- Type rotation angle
- Enter.
Copy (CO+Enter):-
This command is used to copy an object at a specified distance or direction. It works almost like Move Command. The only difference is that it makes a copy of the original objects.
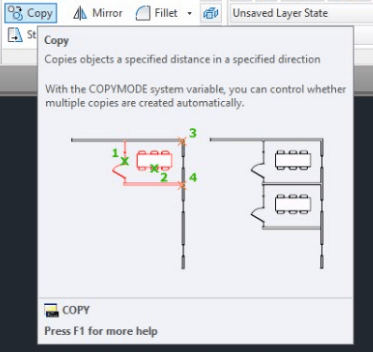
Process of using Copy command:-
- Select copy command.
- Select object.
- Right click
- Specify base point.
- Move it any direction.
- Make multiple copies.
- Enter.
Mirror (MI+Enter):-
This command creates a reverse copy of the selected object.
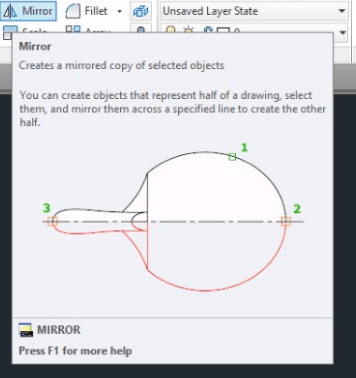
Process of using mirror command:-
- Select mirror command.
- Select object.
- Right click.
- Click on the first point of mirror line.
- Drag mouse in the direction where you want to make mirror
- Specify the second point of mirror line.
- Enter.
Stretch:-
By this command, one can move some part of drawing with maintaining the connection with other parts.
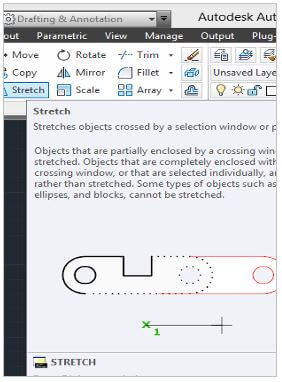
Process of using Stretch command:-
- Select Stretch Command.
- Select the part of the object which you want to stretch.
- Right click.
- Drag the mouse in that direction where you want to stretch.
Scale (SC+Enter):-
By this command, one can enlarge or reduce the objects. The length and width of objects would be enlarged or reduced at the same size.
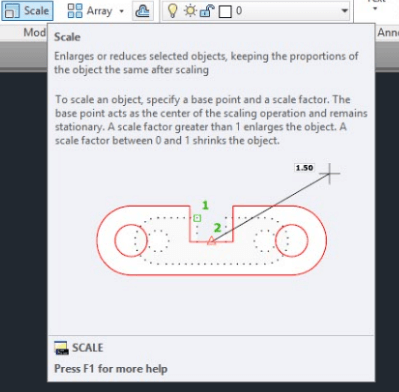
Process of using Scale command
- Select Scale command.
- Select the part of the object which you want to enlarge or reduces.
- Select base point
- Type the value
- Right click.
- Drag the mouse.
Trim (TR+Enter+Enter):-
This command is used to trim any objects whose edge meet the other objects. It trims the crossed line.
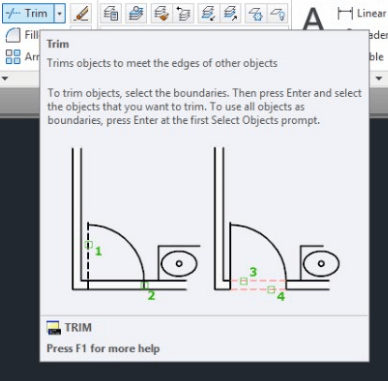
Process of using Trim Command:-
- Select trim command from modify panel
- Double Enter.
- Double click on the intersect line or extra line.
- If we want to exchange trim command into Extend command press shift.
Extend (EX+Enter):-
This command helps to extend the line to join the edges of other objects line. It is used as a trim command.
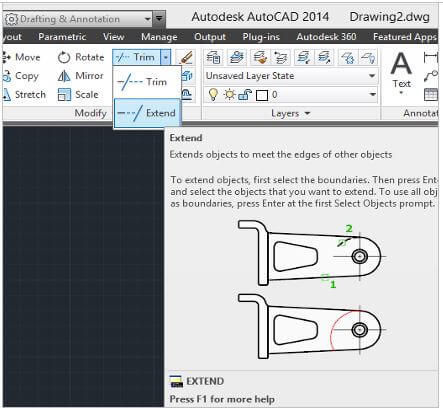
Process of using Extend command:-
- Select Extend command from modify panel.
- Select object.
- Specify opposite corner.
- Right click.
- Double left click on object whom you want to Extend.
- Enter.
Fillet (F+Enter):-
By this command, one can round the straight corner of any objects.
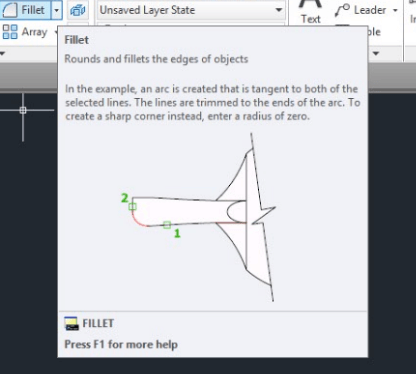
Process of using Fillet command:-
- Select Fillet Command.
- Type R (radius).
- Enter.
- Put the value of radius.
- Enter.
- Select the first object.
- Select the second object.
Chamfer (CHA+Enter):-
By Chamfer command, one can bevels the corner of objects. It cuts the object in any Angle.

Process of using Chamfer command:-
- Select chamfer command.
- Type D (distance)
- Type first chamfer distance.
- Enter
- Type second chamfer distance.
- Enter.
- Select the first object.
- Select the second object.
Blend Curves:-
It makes a Spline between two lines or curves.

Process of using blend curves command:-
- Select blend curves command
- Select the first object
- Select the second object
- Specify types of blends
- Tangent
- Smooth
- Enter.
Erase (E+Enter):-
By this command, one can remove the extra part from any object.
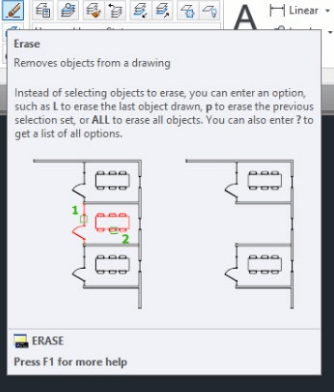
Process of using Eraser command:-
- Select Erase Command.
- Select the object.
- Right click.
- Ok.
Offset (O+Enter):-
By this command, one can create parallel copies of any line, circular copies of any circle at a specified distance.
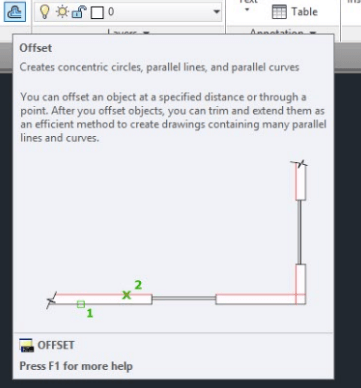
Process of using Offset Command:-
- Select offset Command.
- Enter D (distance).
- Type distance.
- Enter.
- Select object.
- Move the mouse in that direction where you want to be offset.
- Left click.
Array (AR+Enter):-
It creates multiple copies of any objects. We can create multiple copies of objects in the rectangular array, polar array or path array.
1. Rectangular Array:-
It makes copies of any object in rows and columns.
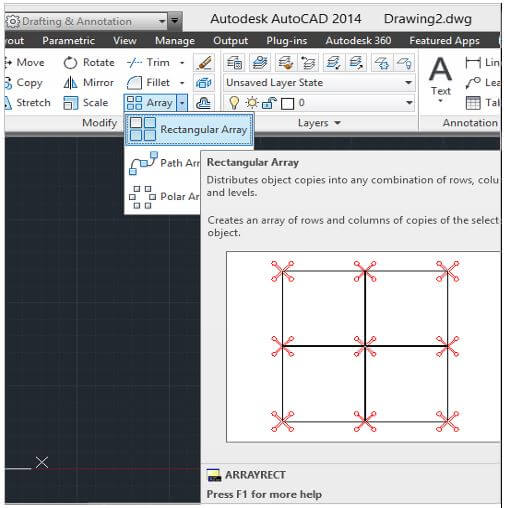
Process of using Rectangular Array:-
- Select Array Command
- Select object
- Right click
- Select Rectangular Array
- Modify values on the Array context ribbon.
2. Polar Array:-
It makes copies of any object around the center point in the circular pattern.
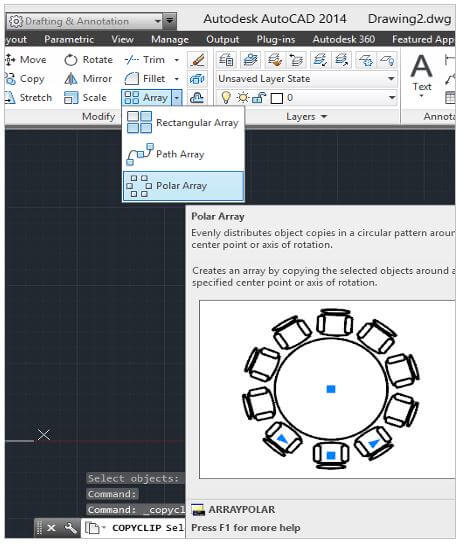
Process of using Polar Array:-
- Select Array command
- Select object
- Right click
- Select Polar Array
- Pick center point
- Click on mid-point
- Modify values on the Array context ribbon.
3. Path Array:-
It makes copies of an object along a Path. One can make a path array in line, polyline, spline, and arc.
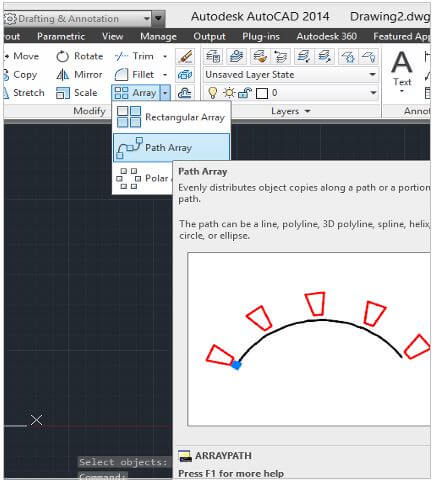
Process of using Path Array:-
- Select Array command
- Select object
- Right click
- Select Path Array
- Select path curves.
- Modify values on the Array context ribbon.
Explode:-
This command is used to break a joint object.
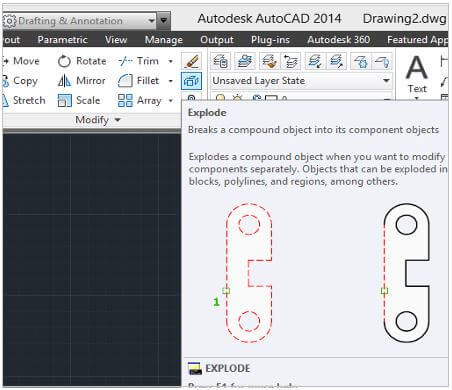
Process of using Explode Command:-
- Select Explode Command
- Select object which you want to break
- Right click.
Lengthen:-
It changes to object’s length and angle of arc. It also works like Trim and Extend.
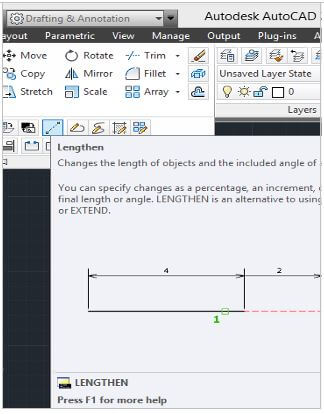
Process of using Lengthen:-
- Select Lengthen Command
- Select an object ( delta, percent, total dynamic)
- Type value
- Select the line or arc in which you want to apply this command
- Click ok.
Break (BR+Enter):-
By this command, one can break a line or object between two points in many part.
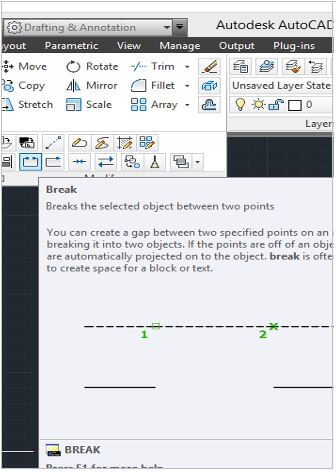
Process of using Break Command:-
- Select break command
- Select the first point of an object.
- Specify the second point
- Ok.
Break at point:-
By this command, you can break a straight line into two parts but there would be no gap between the lines.
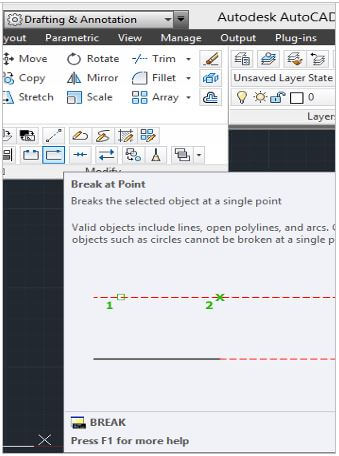
Process of using Break at point Command:-
- Select break at point command
- Click on the first point
- Click on the second point.
- Ok.
Join (J+Enter):-
By this command, one can join the break line or two or multiple lines.
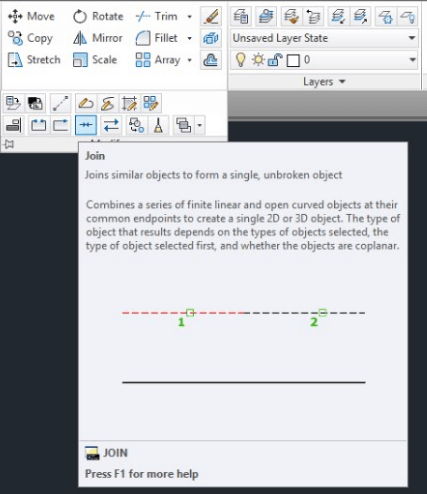
Process of using Join Command:-
- Select join command
- Select the first point
- Select the second point
- Right click.
Edit Hatch:-
One can modify the hatch by hatch edit command.
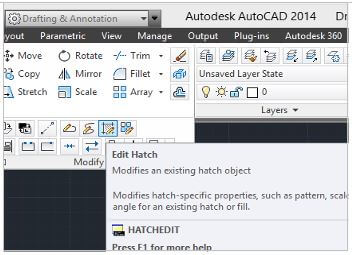
Process of using Edit Hatch Command:-
- Select Edit Hatch Command
- Click on Hatch whom we want to edit.
- Change the swatch if you want
- Change the angle
- Increase or decrease the scale.
- Ok
Edit Array:-
One can edit any type of Array by this Command. We can edit Rectangular Array, Polar Array and Path Array.
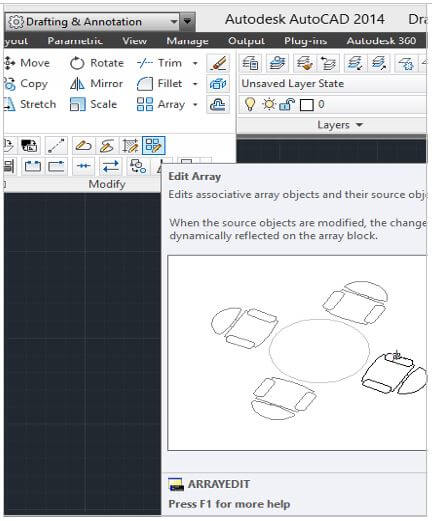
Process of using Edit Array Command:-
- Select Edit Array Command
- Click on that Array object which we want to edit
- Click on first component object
- Click on second component object
- Break the Array component.
- Modify the object.
Edit Polyline (PEdit+Enter):-
It is used to edit any polylines. By this, we can change any straight line into spline, arc-fit, curve etc.
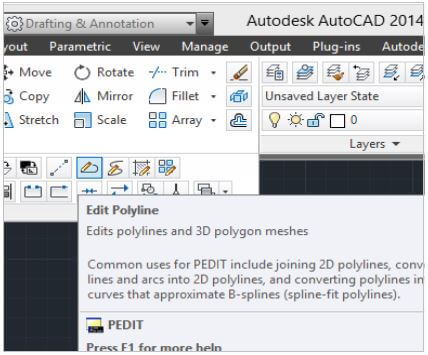
Process of using Edit Polyline:-
- Select edit polyline command
- Select the polyline to modify
- Edit the polyline by entering these options
- Enter c (close) for creating a closed Polyline.
- Enter J (join) to join polyline.
- Enter W (width) to give a width for polyline
- Enter E (Edit Vertex) for editing a vertex.
- Enter F (Fit) for making an arc-fit polyline.
- Enter S (Spline) to create a spline
- Enter D (Decurve) for removing extra vertices.
- Enter L (Ltype Gen)
- Enter R (Reverse) to reverse the polyline
- Enter U (Undo)
- Enter X (Exit) for end the command option
- Enter.
Edit Spline:-
It is used to edit any type of Spline. By this, we can change any spline into polyline.
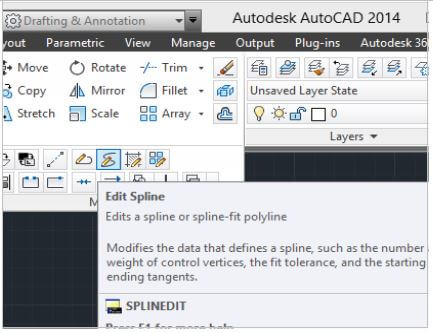
Process of using Edit Spline:-
- Select Edit spline command
- Select the Spline to modify
- Edit the Spline by entering these option
- Enter C (Close) for creating a close Spline
- Enter J (join) to join Spline
- Enter F (Fit data)
- Enter E (Edit vertex)
- Enter convert to polyline
- Enter R (Reverse)
- Enter U (Undo)
- Enter X (Exit) for end the command option
- Enter
Summary:-
The above-mentioned commands will assist you to modify any drawing in AutoCAD. By applying these commands one can edit any line, move and copy any object, make a mirror image of objects etc. We can also convert any Modify command into another command by using some keys.
Author: Hi, I’m Varshikha Singh currently pursuing Interior Architecture course at CAD Training Institute. This blog is all about the modify panel in AutoCAD and its features. Hope this blog will provide you assistance while learning AutoCAD. You can leave your comments and suggestions in the below given comment box.
Thanks for reading this blog.
Very useful, thanks for this post.