
AutoCAD default line types are normally sufficient for day-to-day objectives. Yet often it’s simply insufficient often we require to have our very own. The issue is producing tailored line type can be hard to do. However, if you have actually set up express tools, developing custom line type can be really simple. While not too difficult, it has a tendency to be a job lots of individuals pick to entrust to their firm’s CAD supervisor. It is always advisable to join an appropriate AutoCAD Course from AutoCAD Training Institute.
If, in case you acknowledge specifically what linetypes you would certainly like to establish by yourself, utilize either of both methods listed here to do so.
Process of Adding to the Existing acad.lin File
The very first approach will consist of the interpretation of the tailored linetype to your acad.lin file. In order to locate the location of this data, at the command line, kind (findfile “acad.lin”). The acad.lin documents are where the interpretations of much of the default linetypes reside. Let’s have a look at one of the current interpretations to see exactly how linetype function.
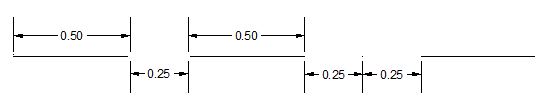
*BORDER,Border __ __ . __ __ . __ __ . __ __ . __ __ .
A,.5,-.25,.5,-.25,0,-.25
Every linetype definition includes 2 lines of message. The initial line has a conventional asterisk, the linetype name, as well as additionally a summary including a message sneak peek of the it. The second line is where things become a little difficult. Initially, we have a standard letter A to specify the alignment kind (frequently A in AutoCAD linetypes), afterwards a collection of values to define the genuine pattern. Positive values denotes a line of that length, negative values denotes a location of that length, in addition to zeros mean durations. Listed below you can see exactly how these values connect to the real one.
Those with message end up being a little bit a lot more made complex by consisting of a part certain to the message in brackets. This bracket section specifies its message, message style, message size, rotation angle, horizontal offset, and also vertical offset.
*HOT_WATER_SUPPLY,Hot water supply —- HW —- HW —- HW —-
A,.5,-.2,[“HW”,STANDARD,S=.1,R=0.0,X=-0.1,Y=-.05],-.2
Among one of the most difficult elements related this is developing the straight as well as vertical offsets, yet those are not likewise challenging to recognize by trying as well as supplying it a number of trial run. Select a message design that exists in all of your pictures, such as the Standard text style. Ensure the text height for that design is readied to 0 in the drawing to make sure that the text height is managed by the height setup in the linetype (s=.1) and also the LTSCALE, as opposed to a fixed value.
At the end of the acad.lin file is area to include your very own personalized one. Compose your very own, as well as save the data. If done appropriately, you need to presently have the capability to load this information using the LINETYPE command.
Custom AutoCAD Linetypes with Express Tools
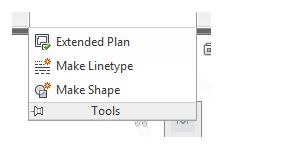
The 2nd method of linetype creation does not need you to develop your very own linetype interpretation in the acad.lin file, however does need AutoCAD Express Tools to be set up. On the Express Tools tab of the Ribbon, open the Tools panel to situate the Make Linetype as well as additionally Make Shape buttons.
The benefit to utilizing the Express Tools approach is that it enables you to conveniently produce shape and also include this right into your linetypes. Compose your shape, and after that make use of the Make Shape tool to develop a.shp file for it. Utilize the SHAPE command to put your shape right into your illustration, and also prepare the pattern of your linetype.
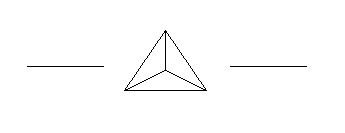
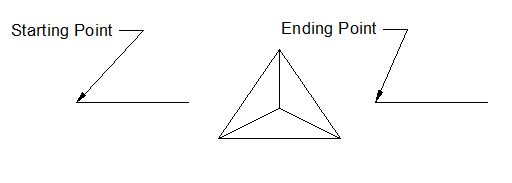
Presently, make use of the Make Linetype to produce yours based upon this pattern. It will absolutely inspire you for a location for the new.lin file along with the it’s name in addition to description. When it requests the beginning and also ending points for the line definition, define the area that will certainly be duplicating throughout the linetype.
You have your very own customized one integrating a customized form.

Just to make sure that they work in a proper way using forms, both the.lin and.shp need to be in an Support File Search Path, such as the area of your acad.lin file.
AutoCAD training in Delhi provided by CAD Training Institute, the best AutoCAD training institute in Delhi with 100% placement assistance with live project training. CTI offers training in advanced AutoCAD Course for all the students who are willing to create advanced drafting and elevations using AutoCAD’s 2D & 3D.